DCS F-15C Training Missions


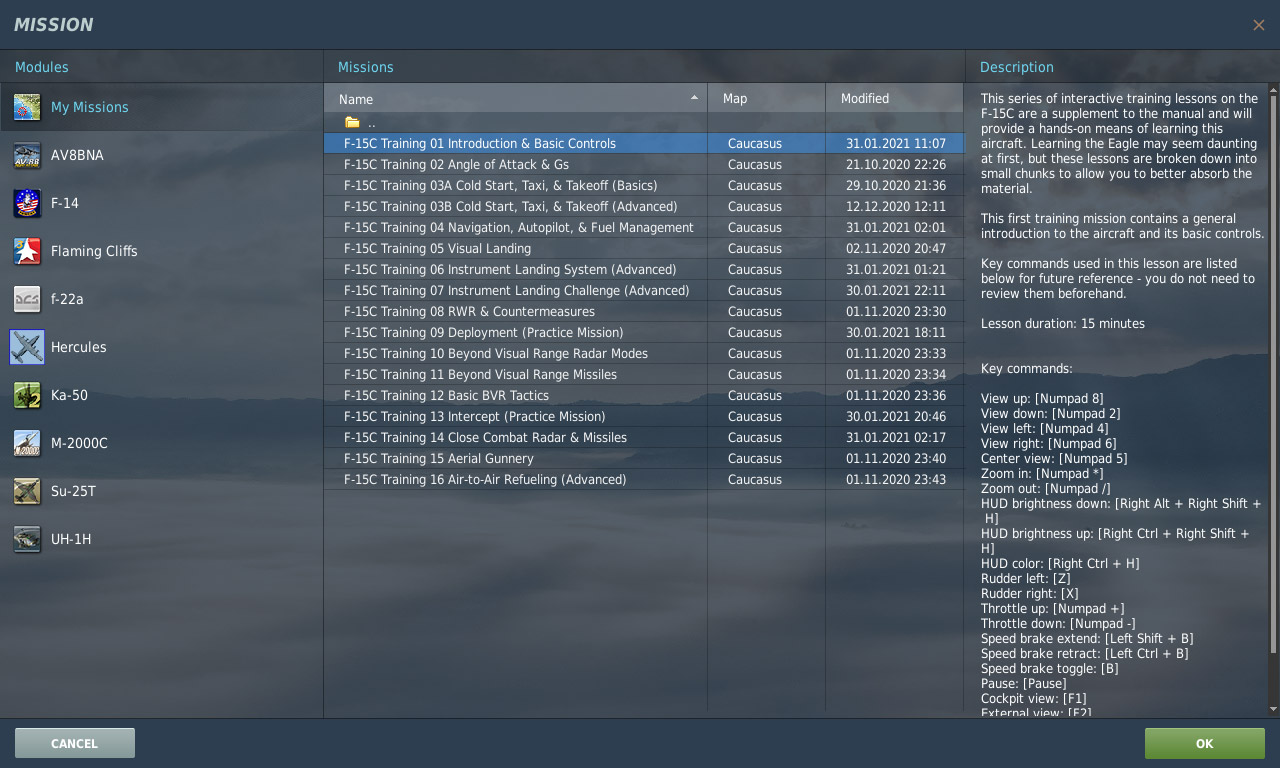
A set of 17 training missions for the DCS F-15C set in the Caucasus covering all important aspects of flying the F-15C, aimed at both beginners and intermediate pilots

About


These missions are aimed towards players who are new to DCS and fairly new to flight sims in general, and so attempt to strike a difficult balance between accessibility (avoiding information overload) and covering everything important. However, I also recommend these to anyone interested in becoming more proficient in the F-15. They're generally intended as a supplement to the DCS F-15C manual, but I also go over some aspects that are undocumented (i.e., not in the manual), such as autopilot operation and air-to-air refueling.

(This material is not made or supported by Eagle Dynamics SA.)

Download the missions

Contact


Please let me know if you have any feedback, suggestions, or bug reports! You can join the discussion thread on ED Forums or send me a private message over there, or just send me an email.

Supplementary Notes


The following notes cover material from the training missions that are not included in the official F-15C manual, and are intended as a supplement to the manual.

Last updated 1 February 2021

Table of Contents

Cockpit and Controls

Cold Start and Taxi

Autopilot

Landing

TEWS

Radar

Basic BVR Tactics

Gunnery

Air-to-Air Refueling

  1. Adjust joystick axis curves
    • First, you'll want to add curvature to your joystick axes, if you haven't already. This will make very fine adjustments easier. Values of 20 for pitch and roll are good starting points, although you should experiment and see what works best for you. You can do this by pressing Esc, choosing "Adjust Controls," clicking the "Axis Assign" button, clicking on the relevant joystick axis, and clicking "Axis Tune."
  2. Ask AWACS for navigation to the tanker
    • If you don't know exactly where a tanker is, and if you have AWACS support, you can ask your AWACS for directions by pressing Left Win+I. The AWACS will give you bearing and range relative to an arbitrary point called "bullseye," which should have been described in your mission briefing (and can usually be seen in the F10 map).
  3. Radio the tanker
    • When you're within 15 miles of the tanker, radio the tanker to request joinup.
      1. Open the communication menu with \.
      2. Press F6 to choose tanker.
      3. Press F1 to radio your intent to refuel.
    • Pay attention to the response: the tanker will tell you their indicated airspeed and altitude.
  4. Switch to TACAN steering mode
    • After you've radioed your intent to join up, you can switch your steering mode from NAV to TCN (meaning TACAN, or Tactical Air Navigation), which will give you the range to your tanker. Do this now by pressing Left Ctrl+R. In the bottom right of the HUD, "NAV" changed to "TCN," and the number below this after the "T" is the range to the tanker in miles. The remaining navigation information on the HUD and HSI still applies to your current waypoint.
    • The Left Ctrl+R command both activates TACAN steering mode and opens your refueling door. A green "READY" light on your canopy frame indicates the refueling door is open.
  5. Get a radar lock on the tanker
    • This is optional, but will provide you with the the tanker's location, range, and closure rate, which is particularly helpful if visibility is poor.
  6. Fly to pre-contact position
    • When you radioed the tanker earlier, they should have told you to proceed to the pre-contact position, which is 50 feet (roughly one F-15 length) behind and just below its refueling boom.
    • First, start approaching the tanker from 1,000 feet below their altitude (which they told to you over the radio), so climb or descend to that altitude.
    • Close in on the tanker at a closure speed of about 100 knots. You can see the closure speed directly in your VSD, or approximate it by comparing your indicated airspeed to the speed the tanker radioed to you. (This is approximate because closure rate is calculated from true, not indicated, airspeed.)
    • As you approach 1 mile distance, throttle back to slow your closure rate to about 60 knots.
    • When you're about 1 mile away, begin a gentle climb so you arrive at about 50 feet below the tanker at half a mile. Adjust your throttle so your closure rate is only about 30 knots when you get half a mile away. Remember that the aircraft takes time to react to throttle inputs, so start adjusting well in advance.
    • When you get half a mile away, gently lower the throttle to drop your closure rate to 10 knots at 0.2 miles and only a couple knots at 0.1 mile. For precise speed control, use tiny throttle adjustments and wait for them to take effect. Avoid the speed brake. Err on the side of low speed—it's harder to recover if you overshoot and can no longer see the tanker.
    • As you approach, line up your nose with the base of the tanker's right wing (since your refueling door is on the left side of your F-15), and just under the boom's altitude. Pull up to the pre-contact position and stabilize there.
    • When you're about 50 ft behind the boom and steady, open the communication menu (\) and declare "ready pre-contact."
  7. Fly to contact position
    • Slowly advance to contact position, which is just past the boom, since the refueling door is behind your cockpit. Don't concentrate on the boom (it will be behind you); concentrate on the tanker.
    • When you are in contact position, you will be able to just see the director lights under the tanker's front fuselage. The lights illustrate your position relative to optimal. The left strip is altitude - if the rear red light (highest in your view) is lit, you're too high, and the front red light (lowest in your view) means you're too low; the green middle light is optimal. The right strip indicates your fore/aft position—the forward red light means you're too far forward, etc. When you're steady in contact position, the tanker will steer the boom to your refueling door and begin refueling.
    • If the tanker calls "return pre-contact," return to the pre-contact position, and radio "ready pre-contact" again if necessary.
  1. Refueling
    • The "READY" light on your canopy frame will turn off when the boom is connected, and will light back up if you disconnect.
  2. Complete
    • When you're fully topped off, the tanker will radio that they're disconnecting; then, throttle down just a little and descend slightly to back away from the tanker.
    • Close the refueling door by pressing Left Ctrl+R.

HOTAS Mapping


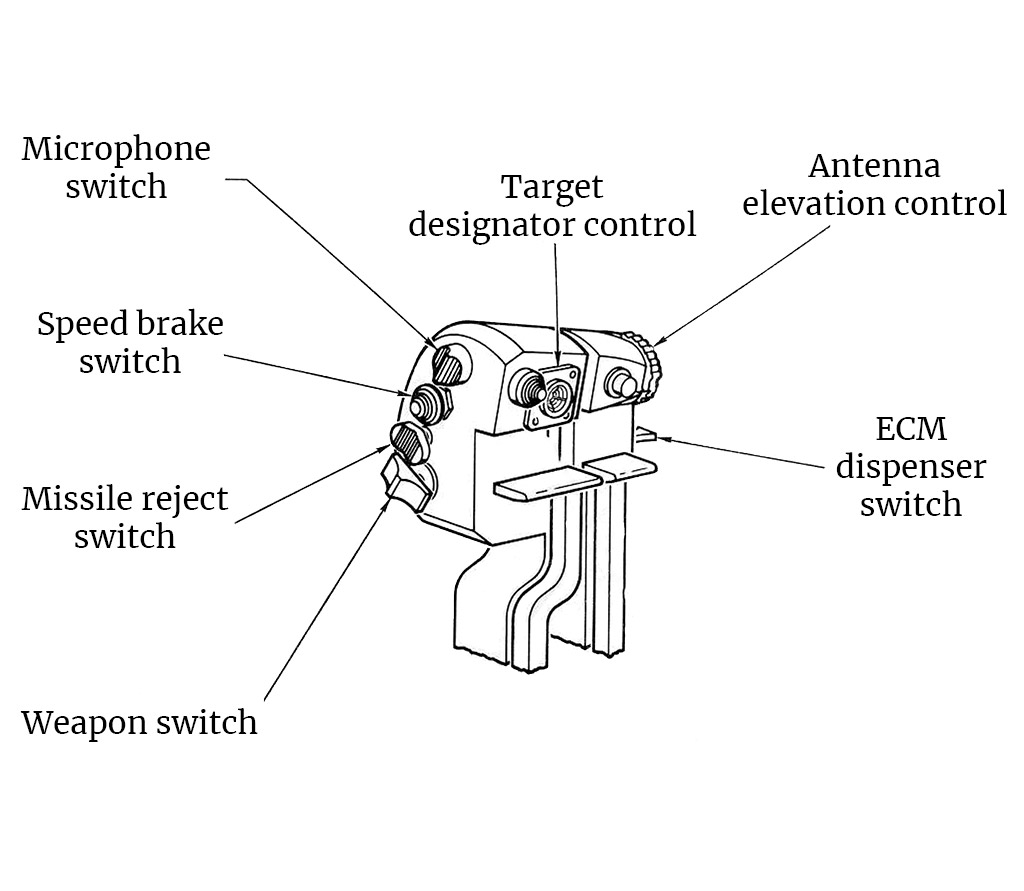
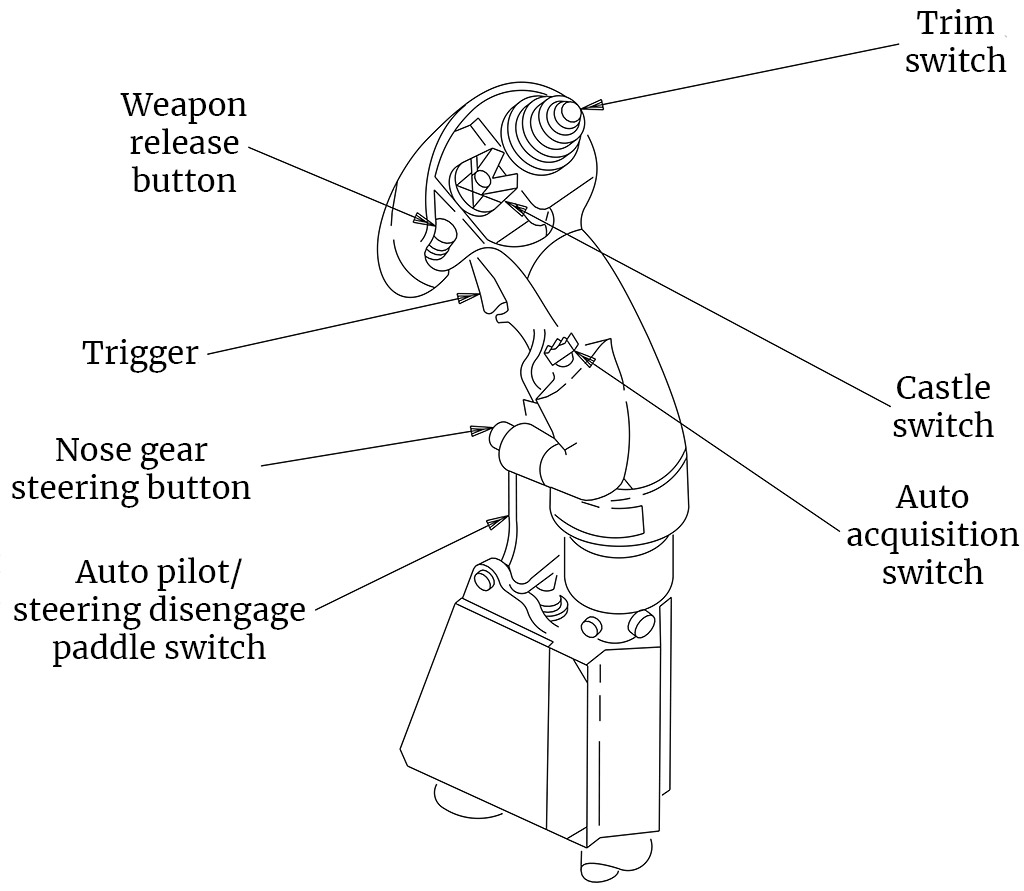
Here's my take on how DCS commands most closely map to the real-life throttle and stick controls. Note that many functions are not implemented in DCS (such as IFF and missile rejection), which is why some controls are unlabeled.

  • Microphone switch
    • Communication menu
    • VoiceChat push-to-talk
  • Target designator control
    • Axis mapping:
      • Up/down: TDC Slew Vertical
      • Left/right: TDC Slew Horizontal
    • Button mapping:
      • Up: Target Designator Up
      • Down: Target Designator Down
      • Left: Target Designator Left
      • Right: Target Designator Right
    • Press: Target Lock
  • Antenna elevation control
    • Axis mapping:
      • Radar Vertical
    • Button mapping:
      • Up: Scan Zone Up
      • Down: Scan Zone Down
  • Speed brake switch
    • Aft: Airbrake On
    • Forward: Airbrake Off
  • Missile reject switch
    • Aft: Unlock TWS Target
  • ECM dispenser switch
    • Down: Countermeasures Chaff Dispense or Countermeasures Flares Dispense or Countermeasures Release or Countermeasures Continuously Dispense (exact function can be programmed)
  • Weapon switch
    • Aft: Cannon
    • Forward: Weapon Change
  • Weapon release button
    • Weapon Release
  • Trim Switch
    • Up: Trim: Nose Down
    • Down: Trim: Nose Up
    • Left: Trim: Left Wing Down
    • Right: Trim: Right Wing Down
  • Trigger
    • Weapon Fire
  • Castle switch
    • Up: Radar RWS/TWS Mode Select
  • Nose gear steering button
    • On the ground: Nose Gear Maneuvering Range
    • In the air: (6) Longitudinal Missile Aiming Mode/FLOOD mode
  • Auto acquisition switch
    • Forward: (4) Close Air Combat Bore Mode
    • Aft: (3) Close Air Combat Vertical Scan Mode
    • Press:
      • In BORE or VS modes: (2) Beyond Visual Range Mode
      • In STT, HOJ, or TWS modes: Radar - Return to Search/NDTWS
  • Auto pilot/steering disengage paddle switch
    • On the ground: Nose Wheel Steering
    • In the air: Autopilot Disengage